

Easy chocolate milkshake combines simple ingredients to create a nostalgic treat that captures the essence of childhood ice cream stands with every sip. This homemade version delivers the perfect balance of creamy texture and rich chocolate flavor without requiring fancy equipment or professional techniques.
The secret lies in the careful selection of quality ingredients and a few simple presentation techniques that elevate this classic dessert. Perfect for satisfying late-night cravings or impressing guests at casual gatherings, this recipe creates a milkshake experience that rivals any café version while allowing you to customize each element to your personal taste preferences.
Table of Contents
Why You’ll Love This Recipe
- Creates the perfect thick, creamy consistency that stands up to a straw but still remains sippable
- Offers complete control over sweetness and chocolate intensity to match your exact preferences
- Provides simple presentation techniques that transform a basic drink into an impressive dessert
I discovered my passion for perfecting chocolate milkshakes after tasting an unforgettable version at a small ice cream stand near my childhood home. The memory of that paper cup topped with clouds of cream and filled with chocolate goodness stayed with me through adulthood.
My early attempts at home involved random scoops and too much milk, resulting in thin, disappointing versions. Through years of experimentation, I’ve perfected this recipe that consistently delivers that nostalgic taste while looking impressive enough for company. Even my friends who claim not to have a sweet tooth can’t resist requesting “one of your famous shakes” during movie nights.
Essential Ingredients
- Whole milk (½ cup): Creates the proper creamy base that lighter milks simply cannot achieve
- Chocolate ice cream (3-4 scoops): Provides both flavor and the thick consistency essential to a proper milkshake
- Chocolate syrup (2-3 tablespoons): Enhances the chocolate intensity while helping achieve that deep, rich color
- Vanilla extract (½ teaspoon): Adds depth and complexity that elevates the entire flavor profile
- Whipped cream (for topping): Creates the classic finish that completes both the visual appeal and taste experience
Preparation Steps
Glass Preparation Place your serving glass in the freezer for about 5 minutes before beginning.
This simple step keeps your milkshake colder longer and helps chocolate drizzle adhere better.
A properly chilled glass also creates that appealing frosty exterior that signals a special treat.
Ingredient Assembly Gather all ingredients near your blender for efficient assembly and to prevent melting.
Measure milk first and pour it into the blender as your base ingredient.
Keep extra ice cream nearby in case you need to adjust consistency during blending.
Blending Process Add chocolate ice cream, chocolate syrup, and vanilla extract to the milk in your blender.
Pulse several times to break up the ice cream before blending continuously for about 20 seconds.
The sound will change from choppy to smooth when it reaches the proper consistency.
Consistency Check Pause the blender and lift the lid to check thickness and color.
For a thicker shake, add additional ice cream; for a thinner version, add a splash more milk.
The perfect consistency should mound slightly when poured but still flow smoothly.
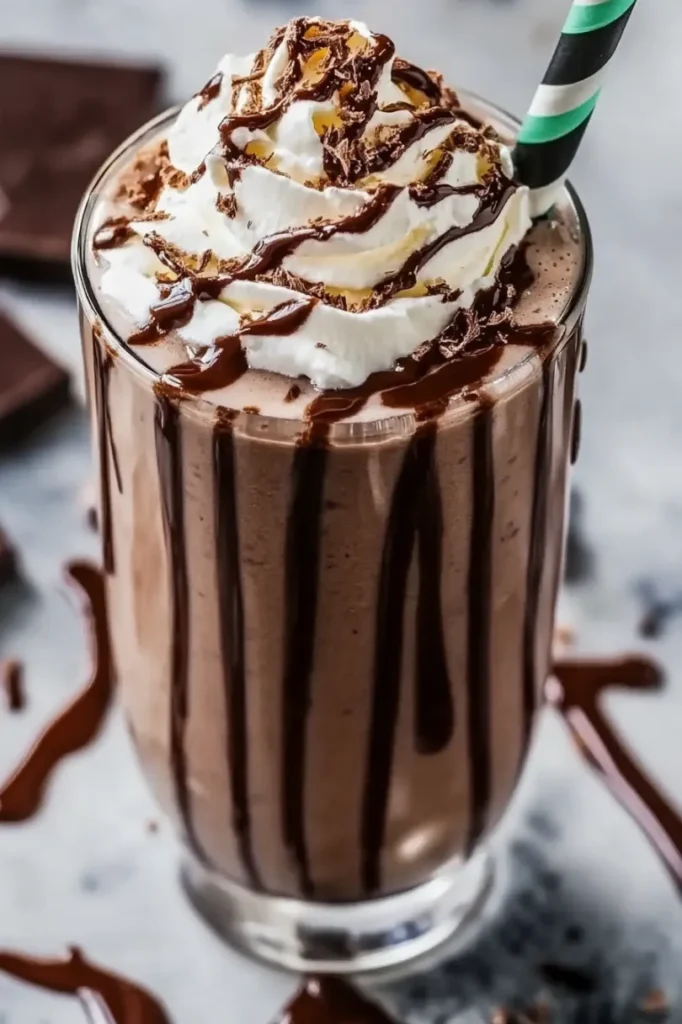
Artistic Drizzle Remove your chilled glass from the freezer and immediately drizzle chocolate syrup inside.
Rotate the glass while drizzling to create decorative streaks along the interior walls.
Allow the drizzle to set for a moment before pouring in your milkshake for the most dramatic presentation.
You Must Know
- The ratio of milk to ice cream is crucial – too much milk creates a thin, disappointing shake
- Whole milk produces significantly better results than reduced-fat alternatives
- Chilling your glass isn’t just for presentation – it actually helps maintain the proper temperature and consistency
I particularly treasure the ritual of making chocolate milkshakes because it connects me to childhood memories while creating new ones. My mother always added a drop of vanilla extract to her chocolate desserts, a tradition I’ve maintained and passed along to my own children.
When my niece visited last summer, we spent an afternoon perfecting our milkshake techniques, with her learning to create the perfect chocolate drizzle inside the glass. Her pride in mastering this small skill reminded me how food traditions create bonds across generations. Now she requests “milkshake lessons” every time she visits, eager to try new variations on our basic recipe.

Serving Suggestions
This versatile treat can be presented in multiple ways to suit different occasions and preferences.
Serve in tall, clear glasses with colorful straws and long spoons for a fun, nostalgic presentation.
Create a chocolate milkshake bar with various toppings like sprinkles, crushed cookies, and chocolate shavings.
Offer smaller portions in shot glasses for elegant dessert tastings at dinner parties.
For special occasions, rim glasses with chocolate ganache and cookie crumbs before adding your drizzle.
Creative Variations
Customize this basic recipe with simple adjustments that create entirely new flavor experiences.
Add a drop of peppermint extract in place of vanilla for a refreshing chocolate-mint combination.
Substitute half the milk with cooled espresso for a sophisticated mocha version.
Blend in a tablespoon of peanut butter for a nutty twist on the classic chocolate flavor.
For adults, a splash of Kahlúa or Baileys Irish Cream creates an indulgent nightcap variation.

Troubleshooting Tips
Solve common milkshake issues with these simple strategies that ensure perfect results every time.
If your milkshake separates quickly, the ice cream may have been too soft – try starting with harder scoops.
For a milkshake that’s too thick to drink through a straw, add milk one tablespoon at a time while pulsing briefly.
When chocolate drizzle slides down too quickly, freeze the glass longer and ensure the syrup is at room temperature.
If whipped cream melts too rapidly, ensure your milkshake has cooled slightly before topping and serve immediately.
Presentation Tips
- Use a squeeze bottle for more precise chocolate drizzle patterns inside the glass
- Sprinkle a light dusting of cocoa powder or grated chocolate over whipped cream for a professional finish
- For special occasions, garnish with a chocolate-dipped strawberry or cookie perched on the whipped cream
My journey with chocolate milkshakes began with that first memorable sip as a child and has evolved into a lifelong appreciation for this simple yet perfect dessert. There’s something deeply satisfying about transforming basic ingredients into a treat that brings smiles and creates moments of pure indulgence.
What I treasure most about this recipe is its ability to connect people. Whether I’m teaching a child the joy of creating something delicious or serving these milkshakes at casual gatherings, they inevitably spark conversation and shared enjoyment. Food memories are powerful, and few treats evoke nostalgia quite like a perfectly crafted chocolate milkshake.
The beauty of this dessert lies in its accessibility. Anyone can create this experience at home, yet the results feel special enough for celebrations. Each time I lift that frosty glass filled with chocolate goodness, I’m reminded that some of life’s greatest pleasures come from the simplest combinations of quality ingredients, careful technique, and the willingness to embrace a moment of sweet indulgence.
Related Recipe:
2-Springtime Screwdriver Recipe

Easy Chocolate Milkshake with Whipped Cream
Ingredients
- Amount Unit Name Notes
- 1/2 cup Whole milk
- 3-4 scoops Chocolate ice cream
- 2-3 tbsp Chocolate syrup
- 1/2 tsp Vanilla extract
- to taste Whipped cream For topping
Instructions
- Prepare the Glass:
- Chill the serving glass in the freezer for 5 minutes.
- Blend the Milkshake:
- Add milk, chocolate ice cream, chocolate syrup, and vanilla extract to a blender.
- Pulse to break up the ice cream, then blend until smooth (about 20 seconds).
- Check Consistency:
- Adjust thickness by adding more ice cream for a thicker shake or more milk for a thinner one.
- Assemble:
- Drizzle chocolate syrup inside the chilled glass.
- Pour the milkshake into the glass and top with whipped cream.
- Serve:
- Enjoy immediately with a straw and spoon!
Notes
-
Storage:
- Best enjoyed fresh.
-
Variations:
- Add peppermint extract for a chocolate-mint twist.
- Blend in peanut butter for a nutty flavor.
-
Pro Tips:
- Use whole milk for the creamiest texture.
- Chill the glass for a frosty presentation.
-
Common Mistakes:
- Over-blending can make the shake too thin.
- Skipping the chocolate drizzle reduces visual appeal.